How to create your own Active Directory Homelab

If you're applying for help-desk jobs or simply want to practice using Active Directory in a simulated environment, then I'd recommend creating
a home lab like this one.
To start, we need to download and set up a few things.
Firstly we want to download a VMM, Virtual Machine Manager, a software which will let you create and manage virtual machines.
I recommend you download either Oracle VM VirtualBox (it's free and open-source) or VMware; I will be using VirtualBox. After installing your VMM, you need to download
two ISO files, specifically a Windows Server ISO (go for the latest one) and a Windows Client ISO (it can be W10 or W11), you can download both of these directly from Microsoft's website:
they will have an evaluation period of 180 days, which you can even extend, so you'll have PLENTY of time to play around with them.
At this point we want to create two virtual machines with the two ISO we just downloaded, the one with Windows Server will act as the Domain Controller of our simulated environment,
while the other one will act as any Client being connected to the domain and the internal network.
Whether you're using VirtualBox or any other VVM, the process of creating a new Virtual Machine is very similar and fairly simple. You select "New" then specify which OS version you're going
to install and then you select the ISO by browsing to where you downloaded it. After that you'll go through a series of windows in which you'll specify how much RAM, processors and storage memory you'll dedicate
to the virtual machine, I recommend at least 4 GB of RAM, 2 processors and 25 GB of space for each machine.
After creating the two virtual machines you should see something like this (ignore the one at the top):
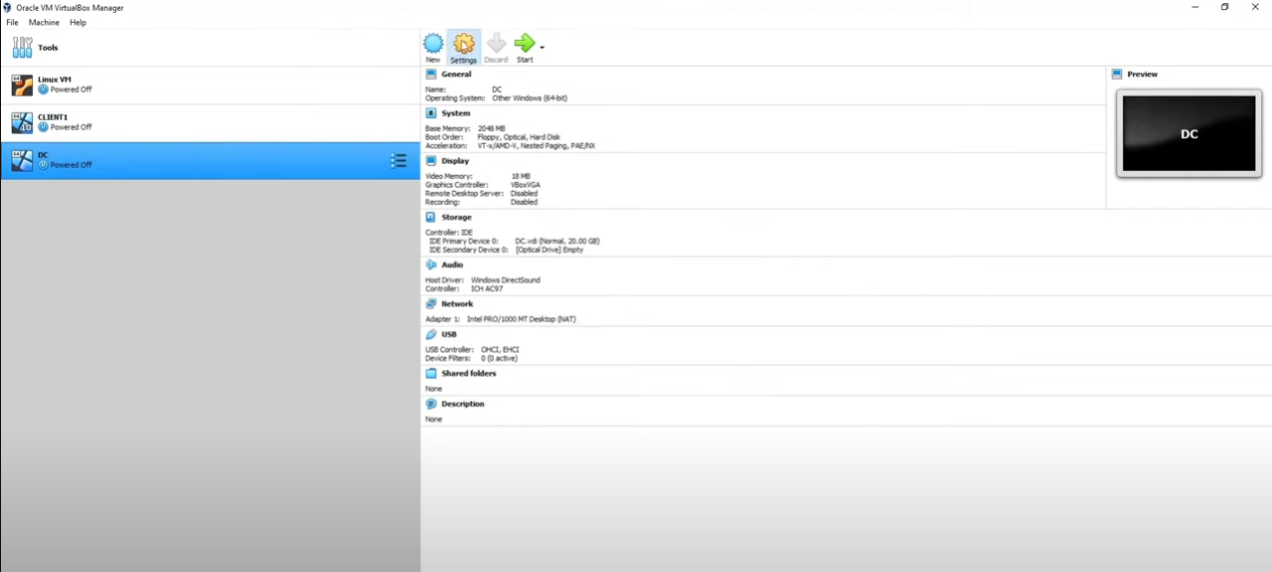
We then change the network settings for both virtual machines, to do that go to “Settings > Network” and select adapter 1 for your Client virtual machine and set that to “internal”. Then go to the same settings for your Windows Server machine, which you can rename “DC” as it will be our Domain Controller, leave the adapter 1 on its default NAT settings, while changing the adapter 2 settings to “internal”.
This way we will have 2 adapters (NIC) on our DC virtual machine, one to connect to the internet (through our home internet connection), and the other one for the internal network of this environment we're gonna create.
Preparing the DC virtual machine:
Run the virtual machine and install Windows Server, simply follow the instructions on screen, set up a password that you will remember, and then finish the installation.
First thing we want to change the PC name, so right click the windows logo/start menu > System >Rename this PC. This is to remember that this PC/virtual machine will act as your Domain Controller.
Once that's done we want to go to “Devices” up top in the VirtualBox menu, and click “Insert Guest Additions CD image…”, then go inside your Windows Server virtual machine and in Device and drivers you will find the VirtualBox Guest Additions, run the amd64.exe file and install that. This is done in order to speed up our virtual machine.
Now we're going to set up the two network adapters that we created before, click on the internet/network icon in the bottom right > change adapter options. You should then see something like this:
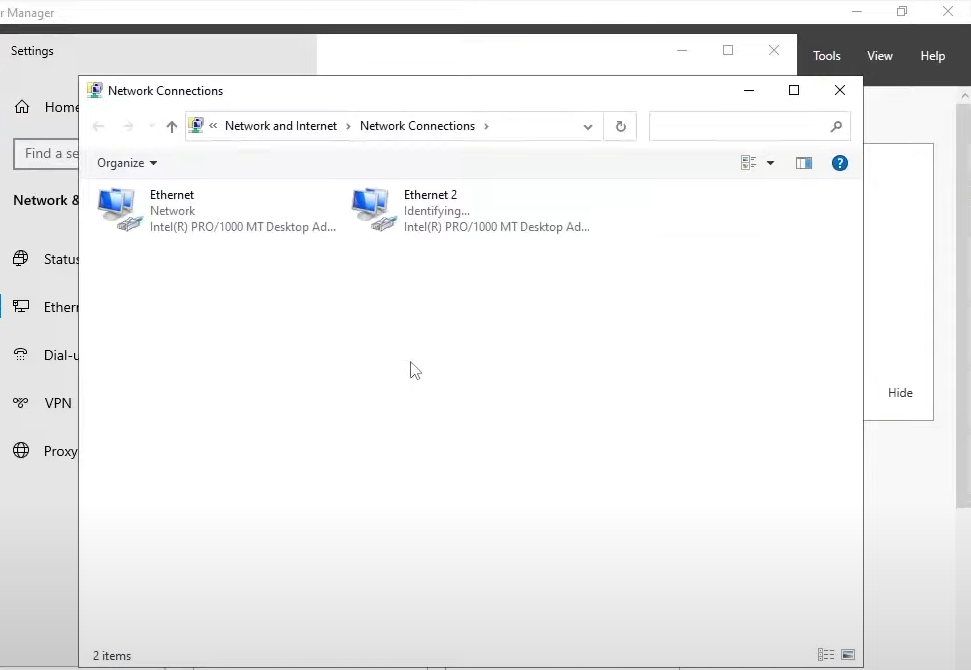
Right click the first one, select “Status > Details” , if it's connected to your home network and has an IP address, it's the adapter that's connected to the internet, so go ahead and rename it “INTERNET”.
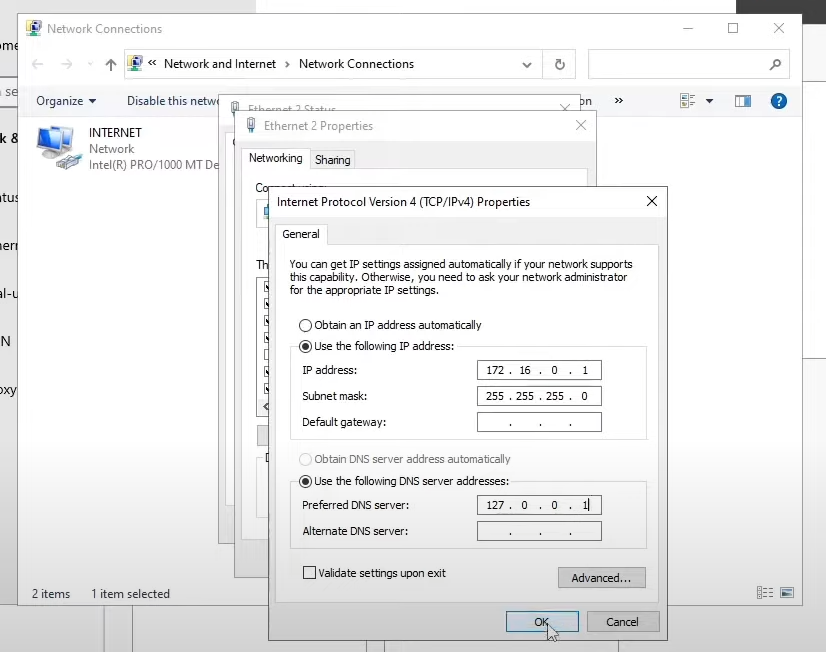
Right click the second one, which has an APIPA address (since it couldn't find any DHCP server) and it isn't connected to the internet. Click on “Properties > Internet Protocol v4 (TCP/IPv4) ” and here you will type in a static IP address, in my example I use 172.16.0.1 (from a private range), and a subnet mask of 255.255.255.0, then on the “Preferred DNS server” you can put a loopback address (127.0.0.1) or the same IP address we typed in above,
this is because this Windows Server/DC virtual machine is gonna use itself as a DNS server.
We should rename this adapter to something like "INTERNAL".
Now it's time to add the Roles and Features we need for this DC virtual machine. From the Server Manager Dashboard, which should open automatically as you log in, click on “Add roles and features”, then click on Next until you can select the Server roles you want to add, and add the following three roles and features:

Then keep clicking Next until the end where you can add Routing (RAS/NAT) as well, and you can now install everything.
Creating a New Domain:
From the Server Manager Dashboard click on the flag you find in the top right corner and select “Promote this server to a domain controller”, then select “add a new forest” and type in the name of your domain, you can use whatever name you would like, I used “mydomain.com” for simplicity.
You're then forced to create a password, it's a “restore password” which we're probably never going to use, so it doesn't really matter even if you won't remember it. After that just keep clicking on Next until you can install everything.
The next time you log in you should see your domain name as well in the login screen.
Configuring RAS and NAT:
We're now configuring the RAS (Remote Access Server) and the NAT (Network Address Translation) in order to allow our Client virtual machine to be on our private virtual network and to make it so it can access the internet through the Domain Controller.
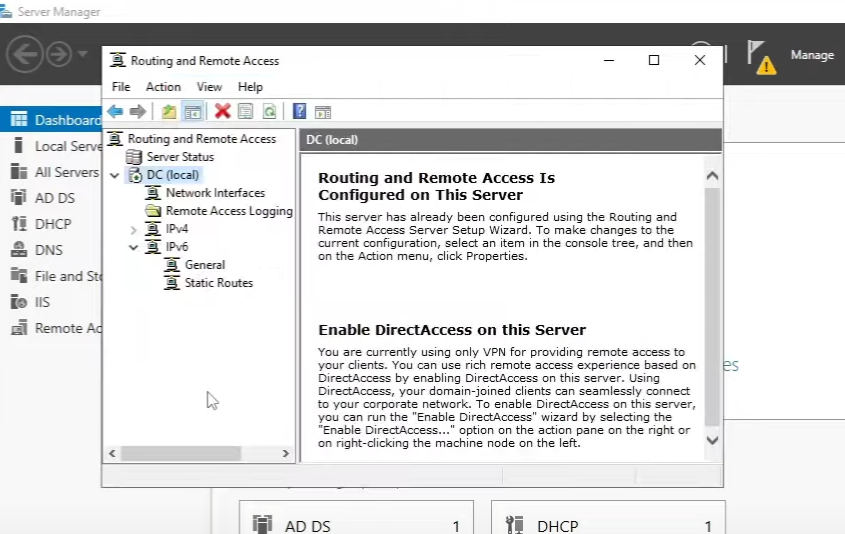
Once again go to Server Manager Dashboard and click on “Tools” > Routing and Remote Access > right click on DC (pc name) and > Configure and Enable Routing and Remote Access > select NAT > then finally select the INTERNET adapter you renamed earlier (if it doesn't show up just close the window and reopen it).
Once that's all done you should have a window that looks like this:
Configuring DHCP:
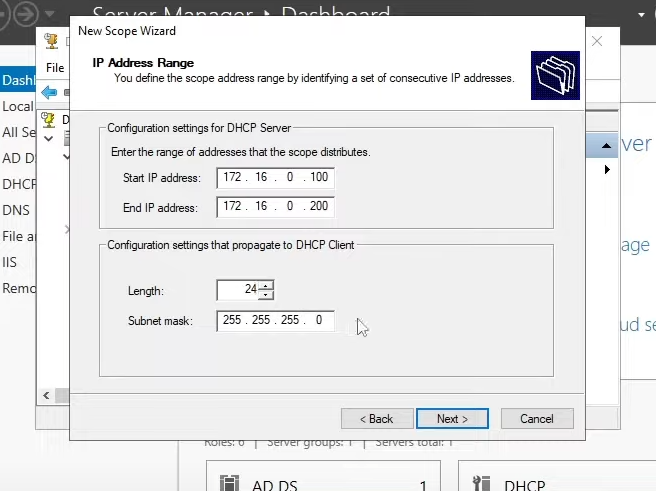
We do this so that when we run and set up our Client virtual machine it can automatically receive an IP address. Select once again Server Manager Dashboard “Tools” > DHCP > select your domain name and then IPv4 > right click and select New Scope. Since we set our IP address earlier as 172.16.0.1, we're gonna create a scope that goes from 172.16.0.100 to 172.16.0.200, then select 24 as length to have a subnet mask of 255.255.255.0.
Then keep selecting Next until you can select “Yes we want to configure these options now (DHCP Options)”, at this point for Default Gateway (Router) add the IP address of the DC virtual machine (in our example, 172.16.0.1), and do the same in the DNS Server window. Ignore the rest and then click on Finish.
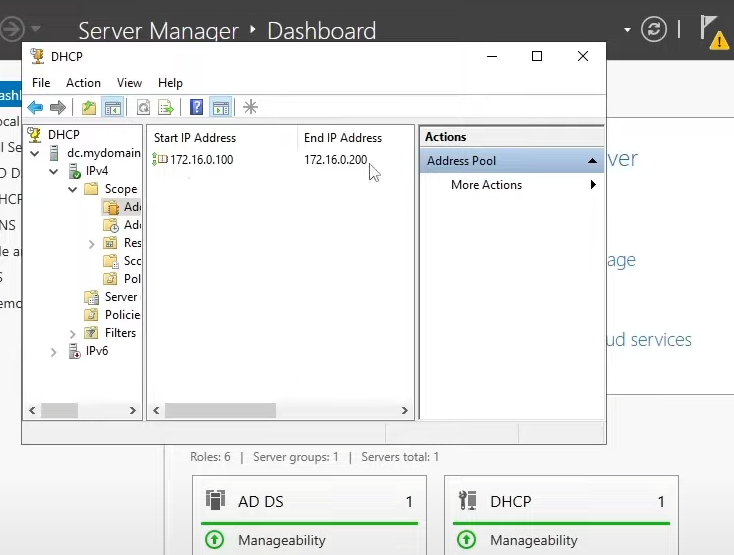
Finally, right click your domain in the DHCP configuration window and click Authorize, then right click > Refresh and it should be connected now. (you should see a small green icon next to IPv4)
This whole process is done to tell the Client machine to use the DC Server as the Default Gateway and as a DNS server, because we configured the DC machine with NAT and Routing capabilities. If all is done properly,
we should be able to connect to the internet with the Client machine through the DC Windows Server.
Before jumping into the Client machine, we need to create our own Account with Admin rights. Go back to “Tools > Active Directory Users and Computers > right click your domain > New > User”. Here you will type first name, last name and the user logon name, make sure to remember the user logon name because that's what we're gonna use to log in later,
after that create a password for the account as well.
Then right click on that account and click “Properties > Member of > Add” and type in Domain Admins (or let the system find it automatically) then click OK and Apply to finish this part.
Now our user account with Admin rights was successfully created.
COnfiguring the Client:
At this point we can finally start our Client virtual machine. Go back to VirtualBox and start up the Client, you'll go through the process of installing Windows 10 or 11
(whichever you downloaded the ISO for), you'll have a trial period of 180 days here as well, but unlike the Windows Server OS this one can't be extended further. (it's still plenty of time)
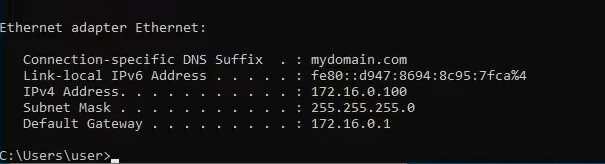
Once installed and once you logged in, open the Command Prompt and type “ipconfig”, you should see that this Client machine is getting an IP from that DHCP scope we set up earlier,
and that the Default Gateway IP address is the same as the one we set up earlier for the DC machine.
You can also try to use the ping command to test if we're connected to the internet and to the DNS Server.
Now we're going to rename this PC and join it to the Domain we created earlier. To do that right click the windows logo/start menu > System > scroll down and go “Rename this PC (advanced)” and click on Change, then rename the PC to something like “Client1” and then select “Domain” and put the domain name you created in the DC machine.
Here you need the credentials of the Admin account we made earlier, once that's done this Client PC is now part of the Domain.
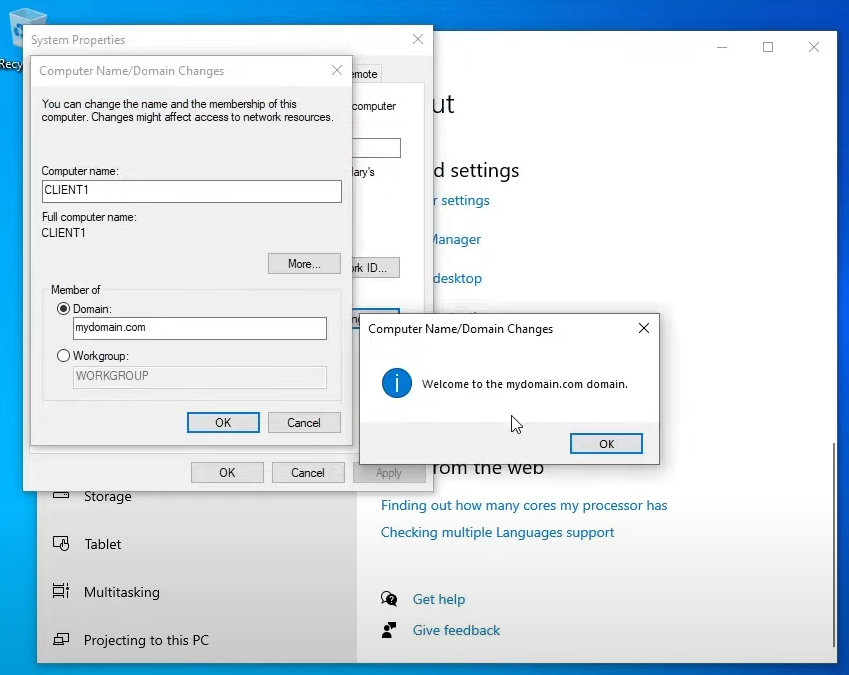
Now we can log in with the Admin account we created earlier, and we can see that this machine is indeed part of the internal network and Domain we just created.
You can then open and run the DC virtual machine, in the Active Directory you will see that “Client1 computer" is present in the network.
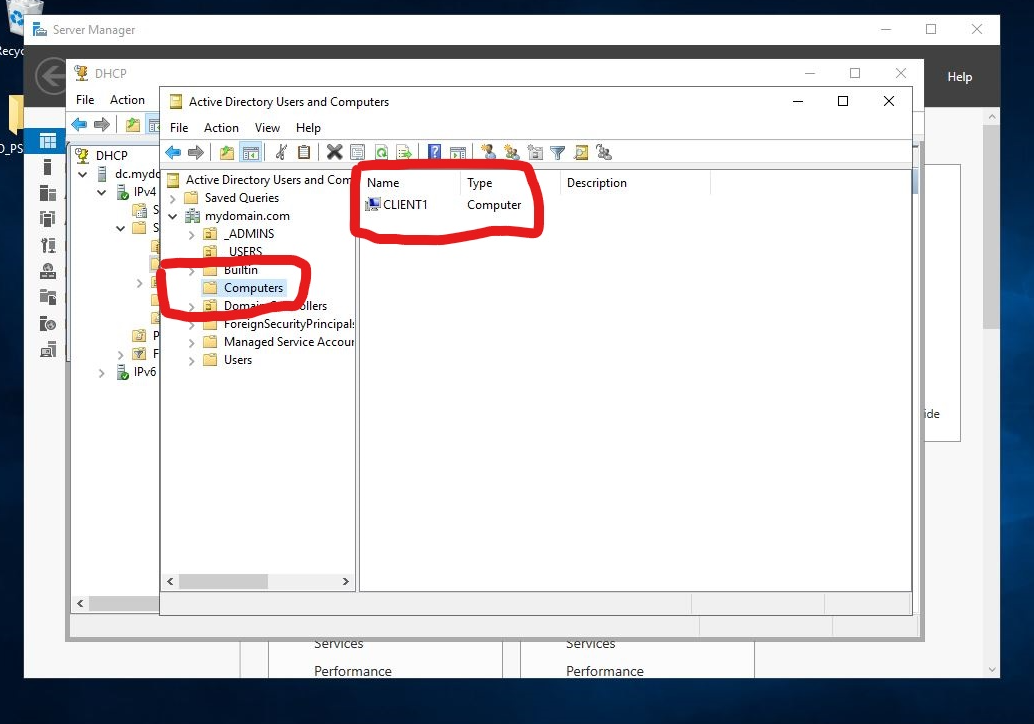
our Active Directory Homelab setup is complete!
You can now experiment with various Active Directory tools and use the two virtual machines to simulate a real Active Directory corporate
environment/network, you can also add more Client PCs to the network and more users, all of which can be managed through the Windows Server
virtual machine acting as Domain Controller.
You can also expand the tools of your Domain Controller and install the GPO (Group Policy Objects) Management console and editor, so you can
play around and become more familiar with the management and creation of GPOs, which are another vital component of any corporate network.