Vulnerability Management LAB using Nessus Essentials

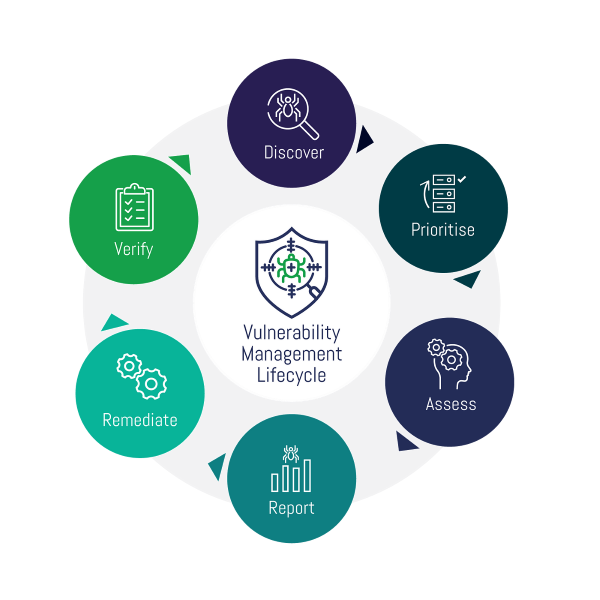
Vulnerability management is a continuous process of assessing your assets and discovering vulnerabilities, remediating them to an acceptable
risk and then repeating this same process over and over, to make sure the risk in a given organization is at a low or at least
acceptable level.
The goal is to remediate vulnerabilities and mitigate risk. From a tactical standpoint it might seem pretty straightforward, however from
a more strategic standpoint, it can get quite complicated. There is a lot to take into account when formulating a plan for the whole
process, before actually implementing a Vulnerability Management program and scanning.
I believe these are the most important steps that need to be followed:
1. Initial planning and assessment: you have to aks questions like how big is the environment, what types of devices and how many are there,
and also, which devices are the most critical ones? Identify and classify all those assets.
2. Policy Draft: write down a Policy with rules that departments and the people in your company should follow.
3. Choose a Vulnerability Management Platform: contact companies (or a specific company), ask them how much it's gonna cost
to use their software for the number of assets and people that your company has.
4. Interviewing Departments and getting people on board for your program:
try to be as transparent as possible, eventually you'll need credentials for a credentials scan. Make sure the departments are able to
follow the rules and Policy regulations, discuss with them about it if there could be any issues.
5. Training and awareness: it's also important to train people and make them understand the process and the reasons behind it.
6. Initial scanning, assessments and remediations: prioritizing is very important so you want to prioritize the most important assets first.
This initial scan and assessment could take very long, depending on how many problems need to be addressed. The following scans and remediations
should be automated and quicker to resolve.
7. Maintain the Vulnerability Management cycle: this is the last step, that is, to maintain a scheduled program that continuously asseses and
performs remediations if needed.
In this Vulnerability Management lab we're going to use Nessus Essentials, formerly known as Nessus Home; it's a free version of the Nessus vulnerability scanner by Tenable and it provides us with all we need.
Tools used:
-
- Virtual Machine Manager (VMM). I recommend either VMware or Oracle VM VirtualBox.
- Windows 10 Pro ISO (180 days evaluation period)
- Nessus Essentials
Getting started:
Go to the Tenable website, in order to download Nessus Essentials you need to register a new account and then follow the
instructions to download and activate the software, you'll receive an email with the activation key, which you will use
to activate your version of Nessus Essentials. Keep in mind that you can also create a similar lab with another popular
Vulnerability Management tool called OpenVAS (as suggested by the name, it's open-source), you can even operate directly in the Cloud with Microsoft Azure and
deploy your virtual machines there, in our case though we'll be using Nessus Essentials and we won't be working in the Cloud.
After you installed Nessus, a page will open on your browser (localhost socket) and from this page you want to click “Connect via SSL”.
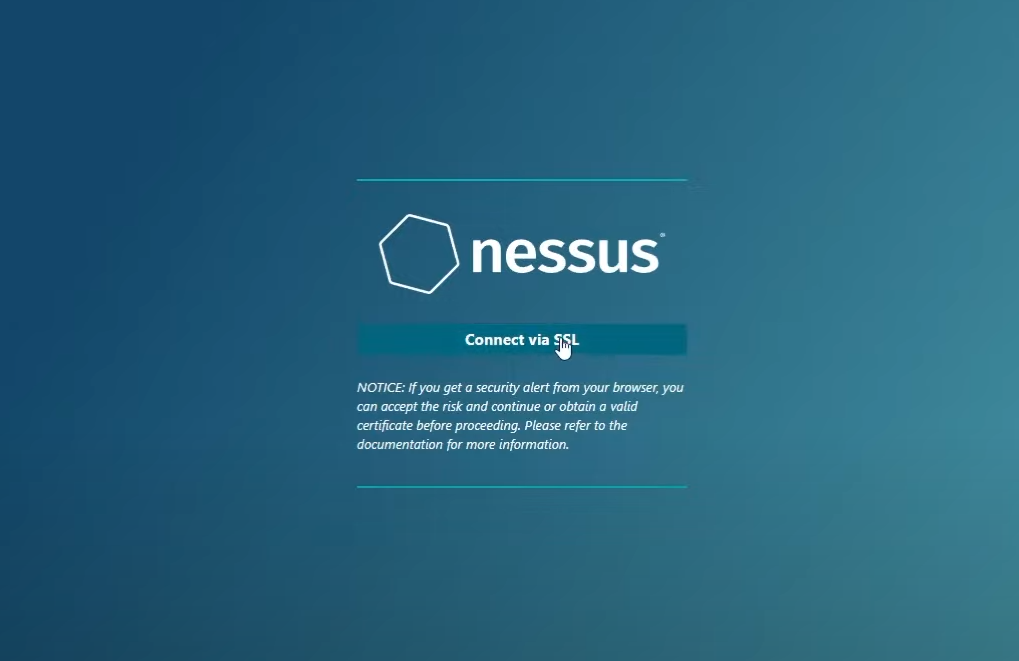
Confirm the connection and wait for the process to finish, it might take a while. After it's done you can use your activation code,
if for some reason you didn't receive it before or didn't get the email, you can type your email here once again and get another code.
You will then need to type in a username and password (be sure to remember them) and then wait for another installation process.
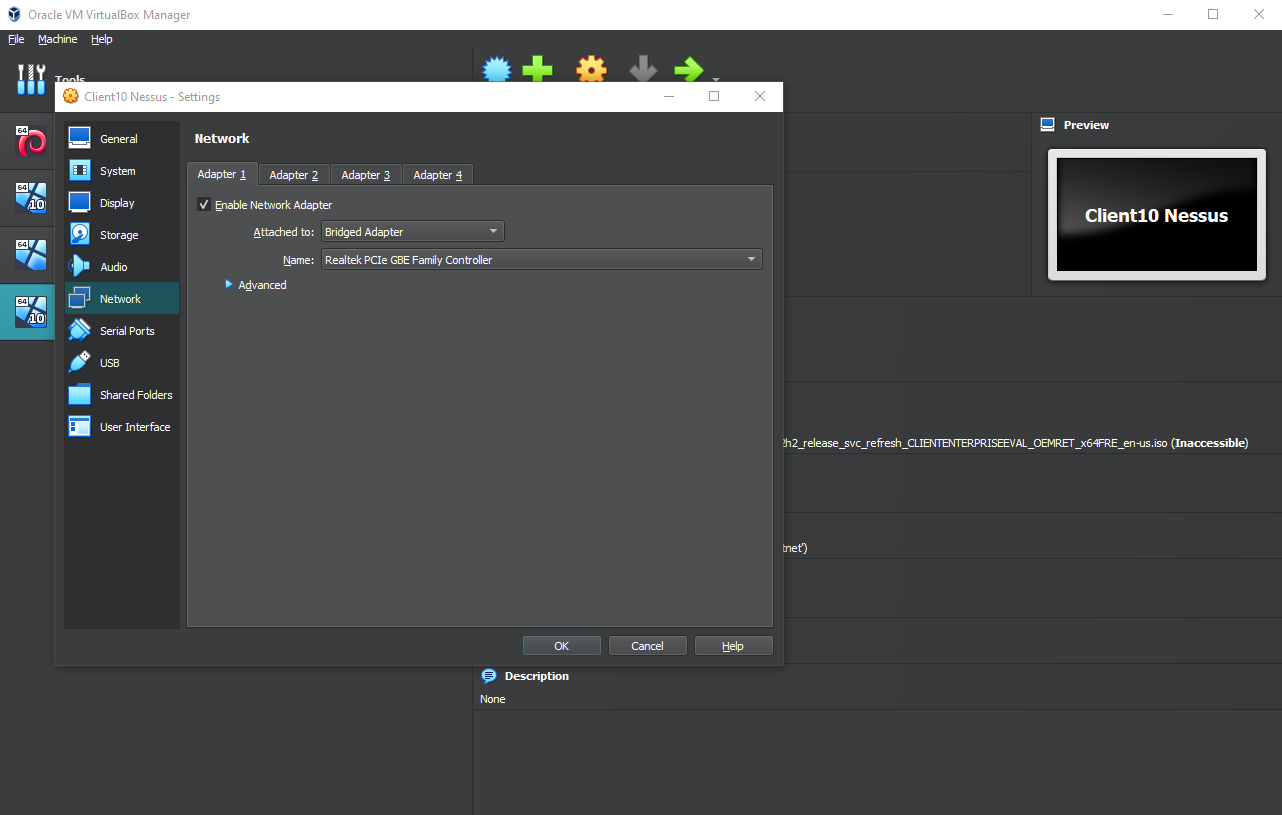
Open your VMM and create a new virtual machine using the Windows 10 Pro ISO, if you can increase the RAM to 4 or 6 GB, and the number
of processors to at least 4 (it's not mandatory but recommended). Then go to Settings and change the Network Adapter
options to “Bridged”, which will put your virtual machine on the same network as your actual physical computer,
so that Nessus can more easily connect and communicate with your virtual machine.
Run your virtual machine and install Windows 10 Pro, make sure to remember the username and password of the Windows account
you just created, otherwise if you forget your credentials you will have to create a new virtual machine again.
Now we will perform a basic scan with Nessus Essentials against our virtual machine, to make sure we can scan it and get some
results from it. To do this, we need the IP address of our virtual machine, so go to your virtual machine
Command Prompt and type “ipconfig”, and copy the IPv4 address. Then go to your local machine (not virtual)
and ping the IP address you just copied, most likely it will say “Request timed out” and you won't be able to ping it,
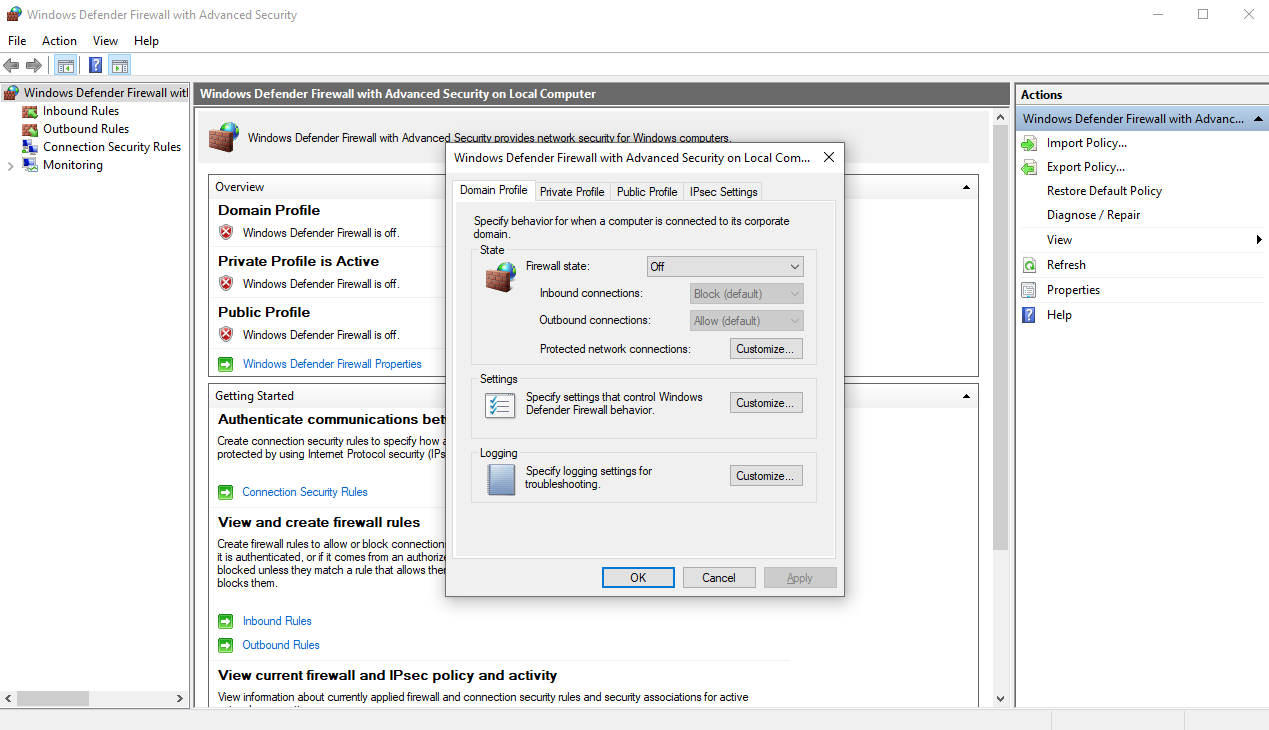
so you'll need to disable the firewall in your virtual machine.
To do that, go in your virtual machine search bar and type “wf.msc” to quickly open your Windows firewall settings,
then click on “Windows defender firewall properties” with a green arrow icon, and turn OFF the first three tabs, “Domain Profile,
Private Profile and Public Profile”. The firewall was blocking all connection attempts
(which is a good thing, but not for the purpose of this lab) so we had to disable it.
This is something you should NEVER do in a production/real environment as it could have severe consequences.
Now if you try to ping your virtual machine you will notice that the ping goes through without any problems.
At this point go to Nessus Essentials dashboard/main page (it should be open in your browser, almost like a web app)
and click on “Create a new scan > Basic Network Scan”. Here you want to type a name for the scan (doesn't matter which name you choose)
and then type the IP address of your virtual machine in the box called “Targets”.
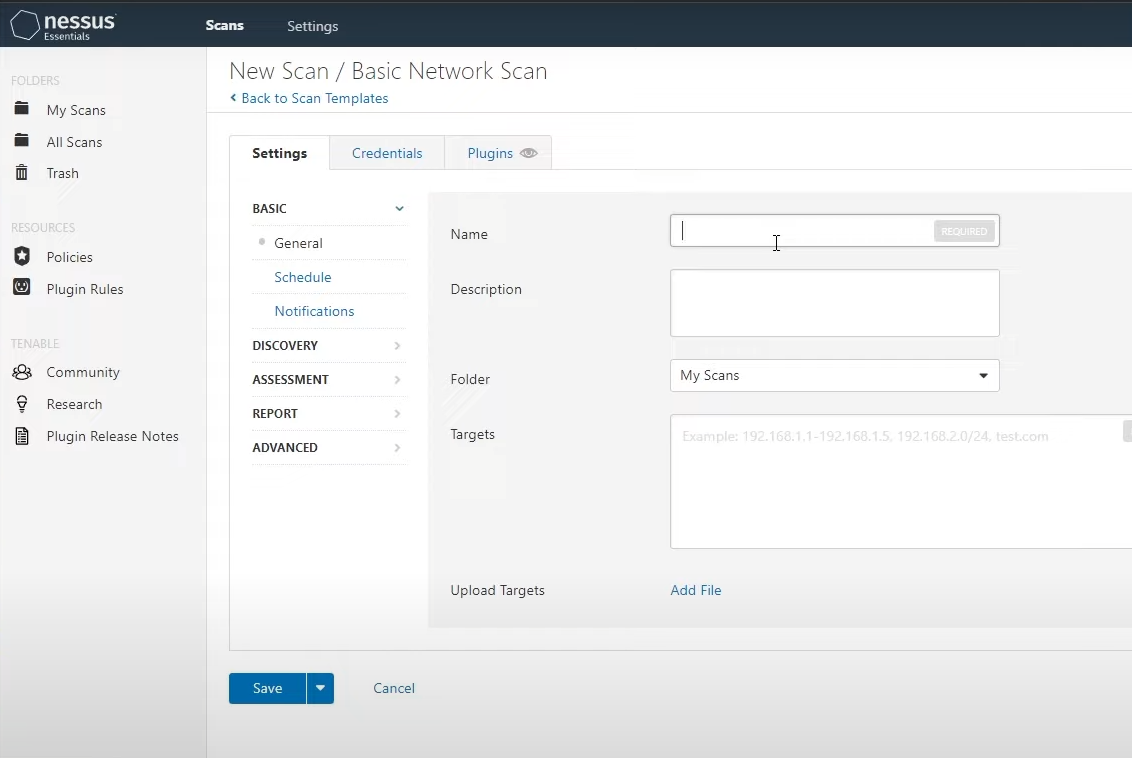
Click on Save and then Launch the scan, for now we will perform just a basic network port scan, however keep in mind that Nessus
Essentials has a lot of different settings and capabilities which allow you to perform a huge variety of scans and deep analyses.
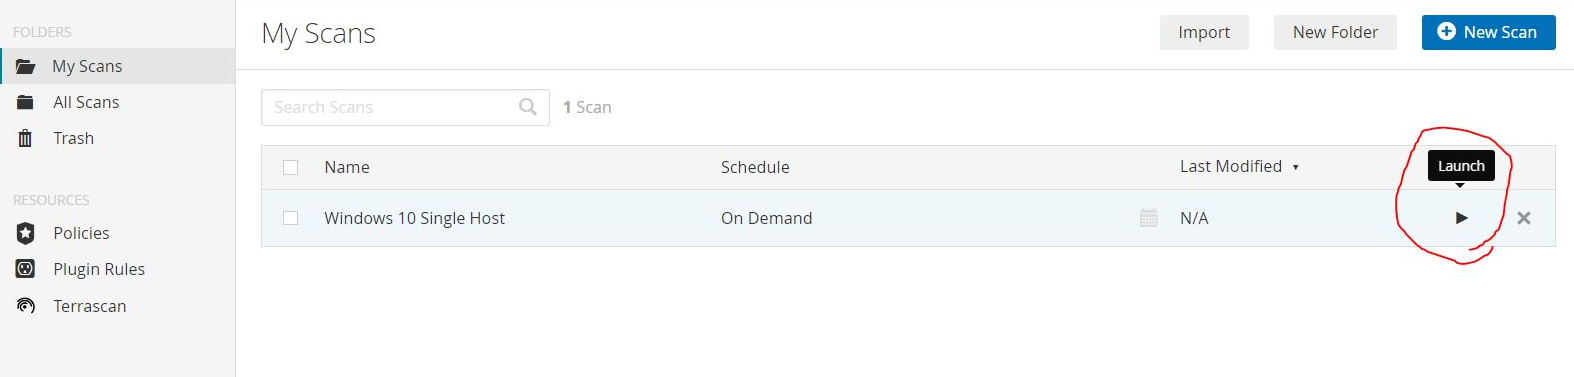
After the scan is done, since we only performed a basic scan, you shouldn't see any vulnerabilities marked as critical or high, at most you'll find a few medium ones. Nonetheless, you can check all the vulnerabilities that were found and all the info reported by Nessus Essentials.
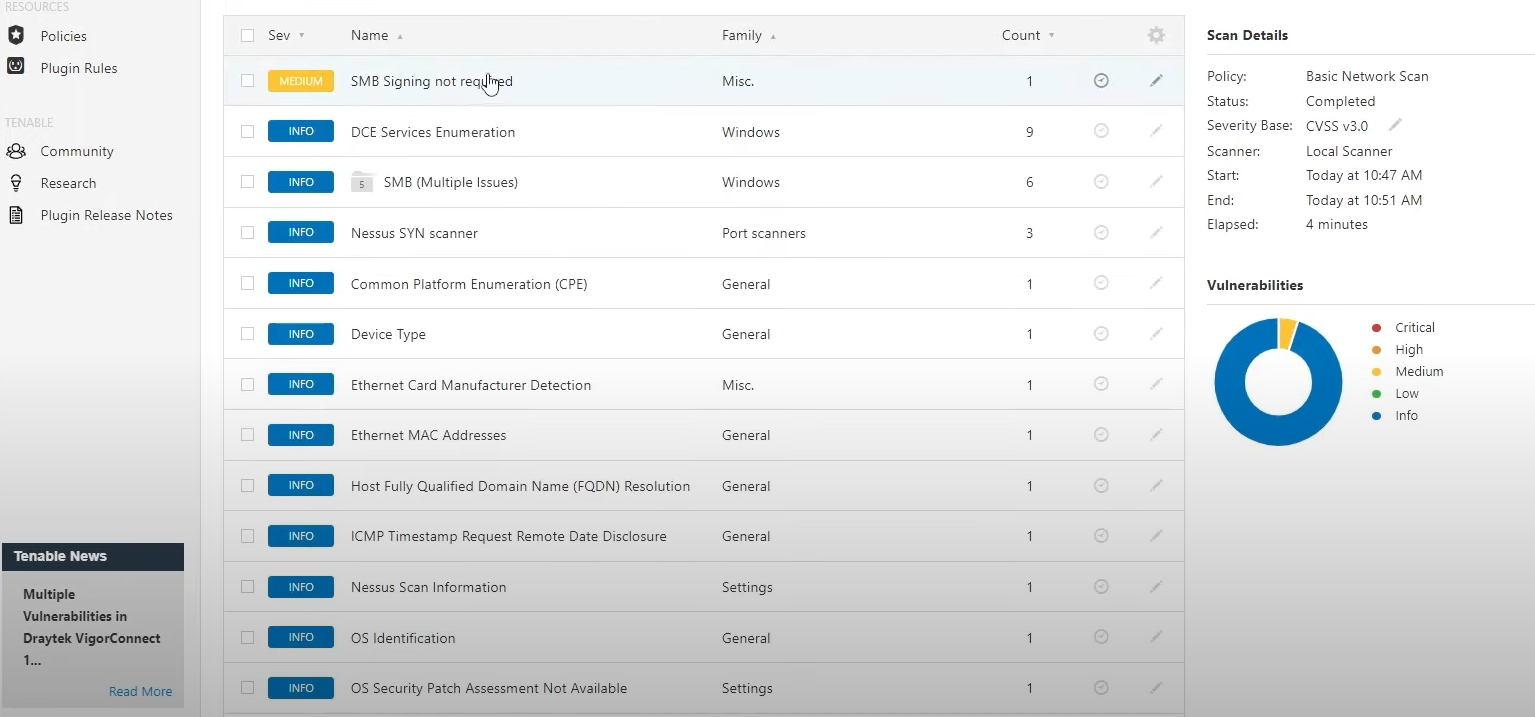
If you click on each of those vulnerabilities, Nessus will provide a lot of details about it, including a description and
a solution to remediate it. The notifications in blue called INFO are generally considered safe as they're not necessarily
vulnerabilities but simply something you should be aware of. The vulnerability in yellow that showed up in your case, regarding SMB,
was generated because we didn't provide Nessus with any credentials as we performed the scan.
Next we're going to configure the VM to make it so it can accept authenticated scans and provide Nessus with credentials,
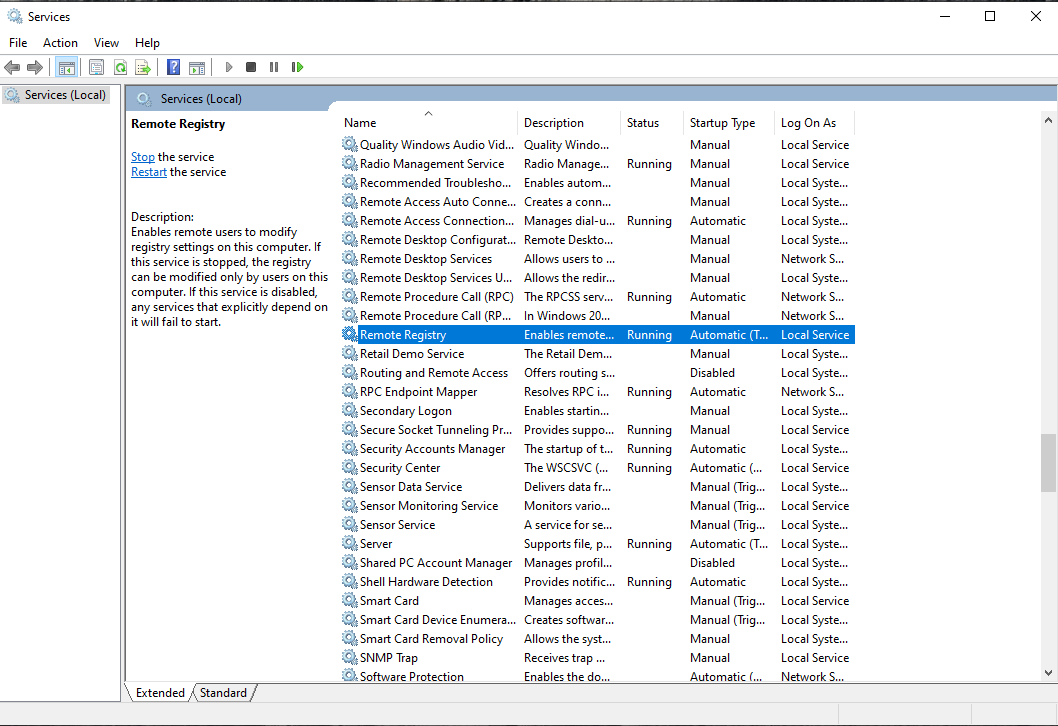
then we rescan the machine so we can compare the two scans. Go back to your Windows virtual machine and type in the search bar “services.msc”, here we will enable the Remote Registry which will allow the scanner to connect to the virtual machine registry and crawl into the registry to look for insecure configurations or other types of vulnerabilities.
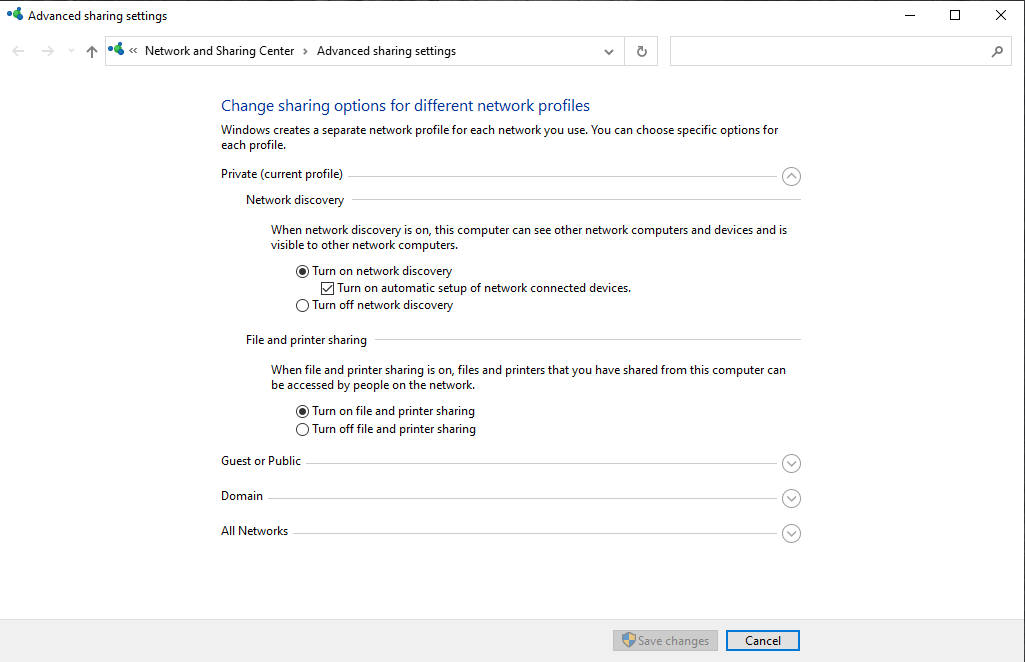
Next make sure to enable “file and printer sharing” in “Advanced sharing settings”. Finally,
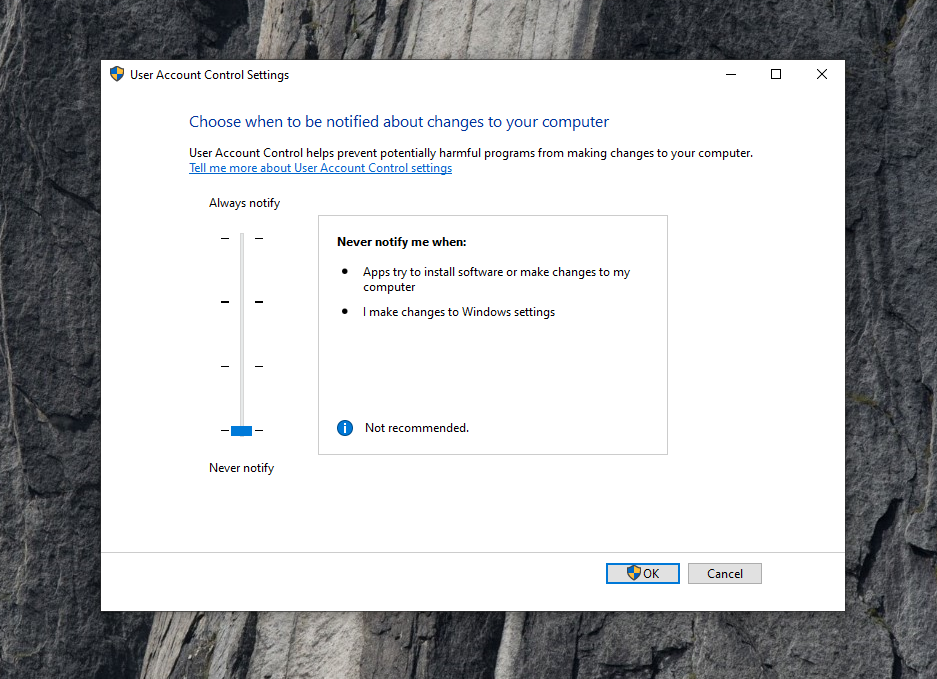
type in the search bar “User account control” and drag down the pointer at the bottom, to “Never notify”. Again,
this is something you shouldn't do normally, but since we're in a virtual lab there is nothing to worry about.
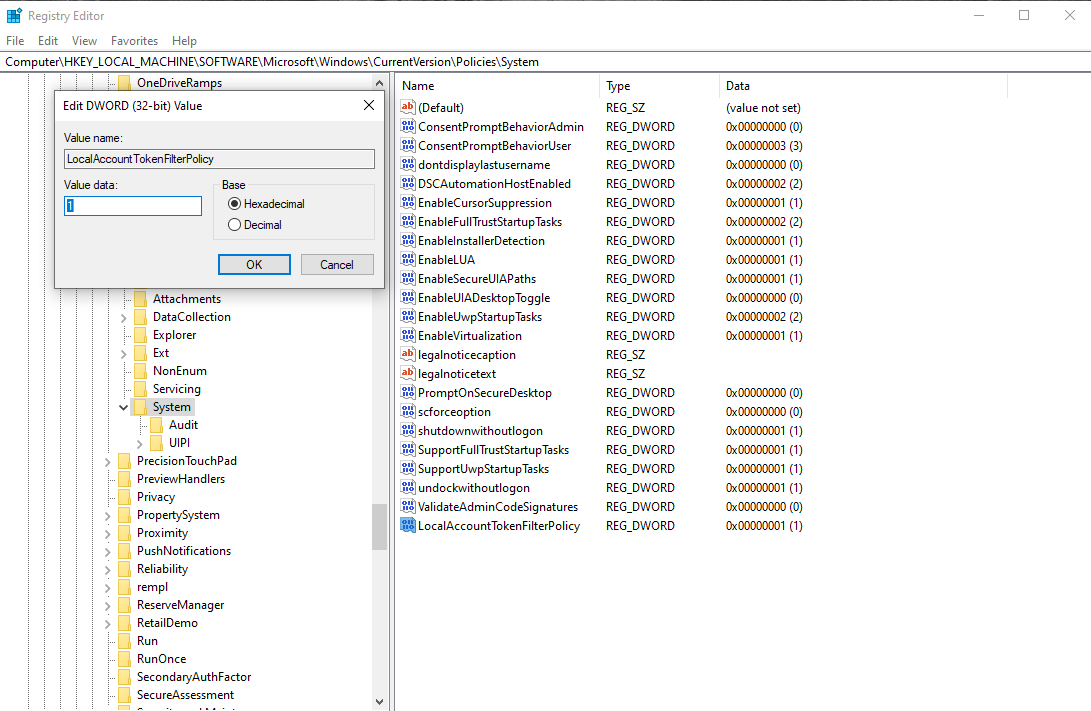
Next we're going to open the Registry Editor and add a key that's supposed to allow Nessus to connect in by further disabling user account controls. Inside the Registry Editor follow this path: “Local machine > Software > Microsoft > Windows > Current version > Policies > System” then inside here right click and create a “DWORD (32-bit) Value” file, and name it “LocalAccountTokenFilterPolicy”, click on it and set its value to 1.
Scanning with credentials:
After restarting your virtual machine, log back in and we should now be ready to scan again,
this time performing a scan with credentials. Go back to Nessus' main page, we're going to edit the previous scan:
check the box next to the scan we made earlier, click “More > Configure” then go to the Credentials tab at the top,
and select Windows credentials. Here type in the username and password of the windows account of your virtual machine, don't touch any
other option and save the scan configuration. Once again, launch the scan and wait until it's finished.
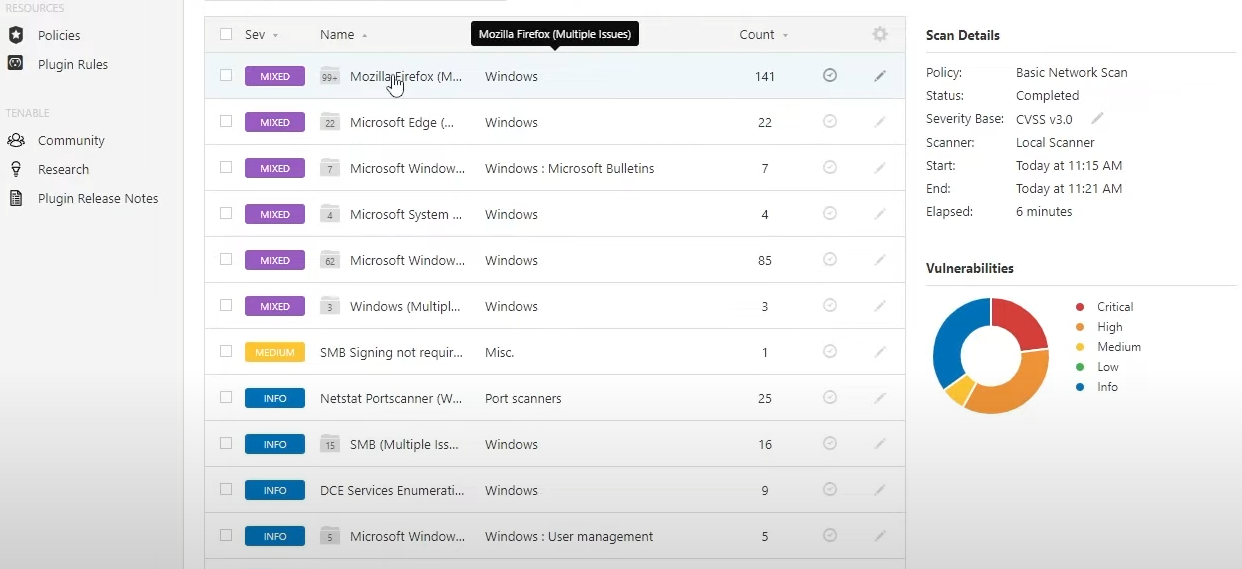
We can clearly see that the scan results this time are quite different, with high and critical vulnerabilities being shown as well.
There's a big difference between doing a scan with credentials and one without, the one with credentials is able to dig much
deeper into the system and find more (potential) vulnerabilities, so if you can, you should always perform a scan with credentials.
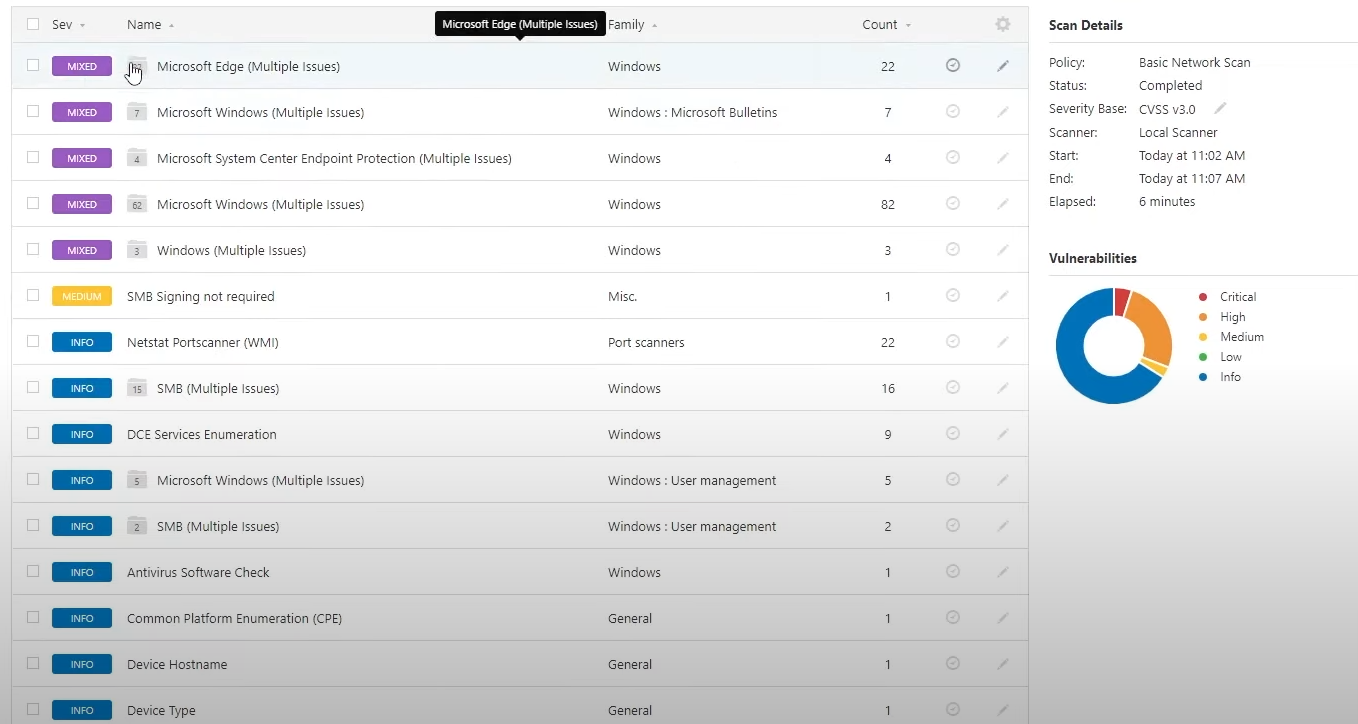
Most of the vulnerabilities shown are caused by the Windows 10 version installed in the virtual machine not being up to date, for example
we can see a lot of vulnerabilities being related to Microsoft Edge, and those can be remediated by simply updating Edge or by updating
Windows directly. Some of the vulnerabilities could be listed as “Mixed”, those are like “folders”, if you click on them you'll see more
vulnerabilities all grouped together, for example a “Mixed” one could list all the vulnerabilities related to Microsoft Edge,
as you can see in the example picture above.
You can also click on the “Remediations” tab at the top and Nessus will tell you exactly what you need to do to remediate
the vulnerabilities found.
If this were the scan from a computer or multiple computers in a real network of a company,
what I would do is I would make sure there is a proper automated Windows patching/updating schedule and that there are no problems
that are stopping all the Windows machines from updating.
Outdated software scanning:
To better see the capabilities of Nessus Essentials we're now going to install a deprecated software, in our case
a very old version of Firefox, and see what Nessus can tell us about that. To do this, we're going to our virtual machine and
we're going to search for an old version of Firefox to download. You should easily find directories with older versions
(even 2-3 years old) of Firefox from the first results you see on google, just make sure you're downloading it and installing
it on your virtual machine, not on your actual computer.
Now that we have our deprecated version of Firefox installed in our virtual machine, we can go back to Nessus on the main pc and run another scan,
we don't need to create a new scan, we can simply run the same one we ran before.
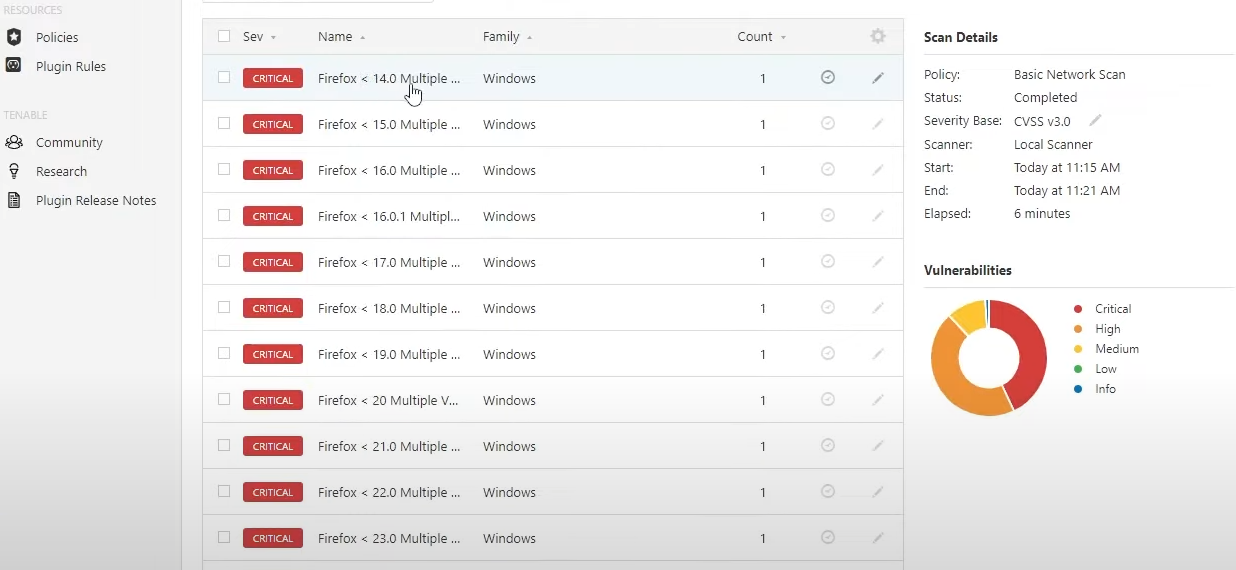
As you can see in the screenshots above, because of the very old version of Firefox we just installed, Nessus found a
lot more vulnerabilities on our virtual machine. A huge number of those vulnerabilities come from Firefox, and most of
them are marked as critical. In a real environment you would simply need to upgrade Firefox (or any other software that's outdated)
to the latest version to remediate these vulnerabilities, and if you check the Remediations tab Nessus will suggest to do exactly that.
We've now done three different scans, each of them having a different amount of vulnerabilities being found, with various degrees of
severity and different ways for remediating them. At this point we can try to remediate all the vulnerabilities found and do our last scan.
The remediation process here is quite straightforward: you can either update or uninstall the old version of Firefox,
and then go to Windows updates and update your Windows virtual machine until there are no more updates available. You should also
check Microsoft Edge and see if that one is updated to the latest version, in case Windows updates didn't take care of it automatically.
Once that's done, run another scan with Nessus and observe the results. You're most likely going to notice way less vulnerabilities
than before, if any, and you shouldn't see any criticals.
Conclusions:
This was a basic lab about Vulnerability Management. I tried to cover the basics and show the core of what Vulnerability Management is, in a practical manner. In a real environment it probably won't be as simple as doing some updates to fix most of the issues (and you want to make sure those updates are done automatically so it's never an issue), and the bigger a company is the more people will most likely need to get involved when fixing vulnerabilities, depending on the company's policies as well.